
Profile Overview Layouts
The overview screen of a pupil, a family or a staff member is built from a layout: a named, reusable arrangement of blocks that decides which information appears on the page and how it is laid out.
Layouts are designed centrally. Somebody at the school — usually an administrator — creates the layouts that are available, and staff members then choose which of those layouts they would like to use. A staff member never builds a page of their own from scratch; they pick one from the list. An administrator can also put staff members onto a layout directly, rather than waiting for them to choose.
Note
A layout only ever shows a viewer the information that they are already allowed to see. If a layout contains a field that a particular staff member may not view, that field is simply left out for them. This means that any layout is safe to offer to any staff member.
Which Layout a Staff Member Sees
Every staff member has, at most, one layout of their own for each screen. ADAM uses the first of these that it finds:
- The layout on their record — whether they chose it themselves or an administrator put them on it.
- Otherwise, the school’s default layout.
Most staff have nothing on their record at all, and simply follow the default. This is why an administrator can improve the default layout and have the change reach everybody who has not made a choice of their own, without disturbing the people who have.
Warning
There is only one layout per person per screen, so an administrator who puts somebody onto a layout replaces whatever they had, including a layout that person had chosen for themselves. Nothing is kept underneath to fall back on. The staff member can of course choose again afterwards, if they have the permission to.
Note
Upgrading from an earlier version of ADAM
Earlier versions of ADAM let each staff member customise their own overview page, and had a single “default” page for everyone else. Those personal customisations have been converted into ordinary named layouts — each named after the person who made it, for example “Jane Smith’s Pupil Overview” — and each person has been set to use their own one. Nobody’s overview screen changes as a result of the upgrade.
A school where customising was popular will therefore see a long list of layouts on the first day. These are ordinary layouts: once their owner has moved to one of the school’s layouts, the old one can simply be deleted.
Assigning the Permissions to Staff
There are six permissions in total, two for each of the three overview screens:
- Manage Pupil / Family / Staff Overview layouts — create, edit, duplicate and delete the layouts that are available for that screen, and decide which staff members are on which layout.
- Choose own Pupil / Family / Staff Overview layout — choose which of the available layouts to use for that screen.
Being able to manage the layouts implies being able to choose one, so the second permission does not also have to be granted to an administrator.
To assign the permissions, open the permissions view of the appropriate staff group and, under Pupil Admin, Staff Admin or Family Admin, look for the Overview heading.

It is entirely reasonable to give most teachers the “choose own” permission, and to keep the “manage” permission for the handful of people who look after the school’s layouts.
Warning
A staff member can only ever see the information that they have been allowed to view through the scratch list permissions, whichever layout they are using.
As usual, a site administrator automatically has all six permissions.
Choosing Your Own Layout
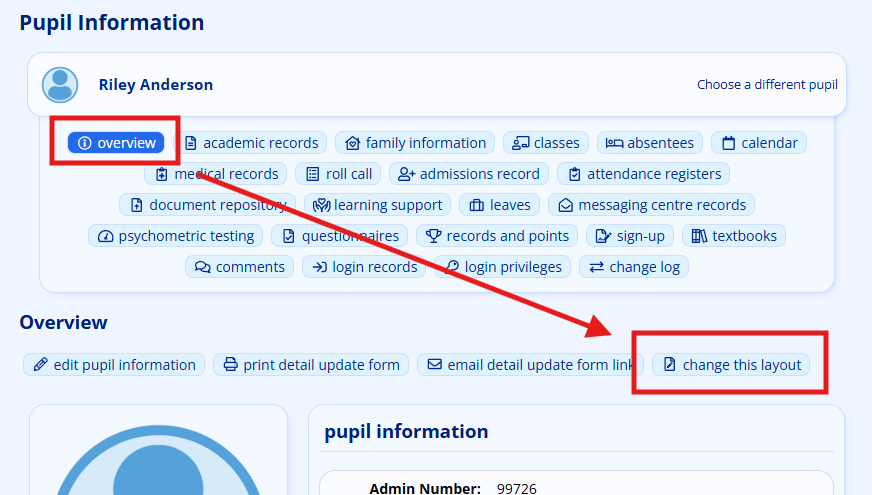
Open any pupil, family or staff overview screen and click on change this layout at the top of the page.
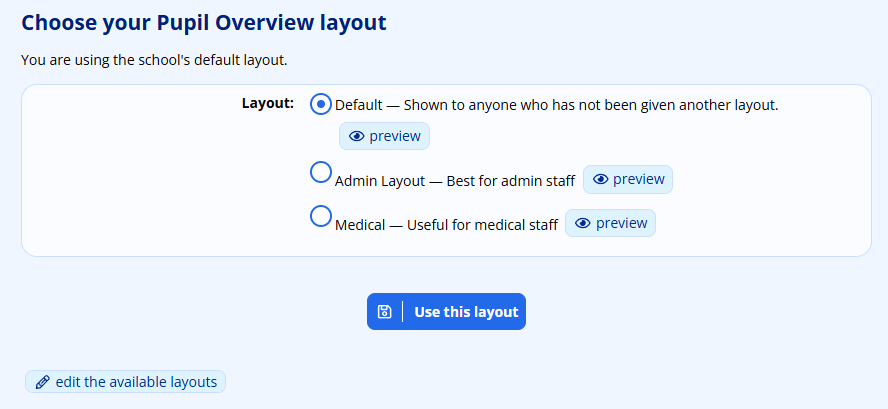
ADAM lists every layout available for that screen, with its description, and shows which one you are using at the moment and why — whether it is one you chose yourself, one your administrator set for you, or the school’s default. Where you have permission to view the profiles concerned, each layout also offers a preview link so that you can see what it looks like before committing to it.
Select the layout you want and click on Use this layout.
If you are on a layout of your own, or on one an administrator set for you, an option appears to go back to the school default. Clicking it takes the layout off your record, so that you follow the school’s default again — and you will pick up any later improvements made to it.
Managing the Available Layouts
If you have the permission to manage layouts, the same change this layout screen offers a link to edit the available layouts. This opens the catalogue of layouts for that screen.
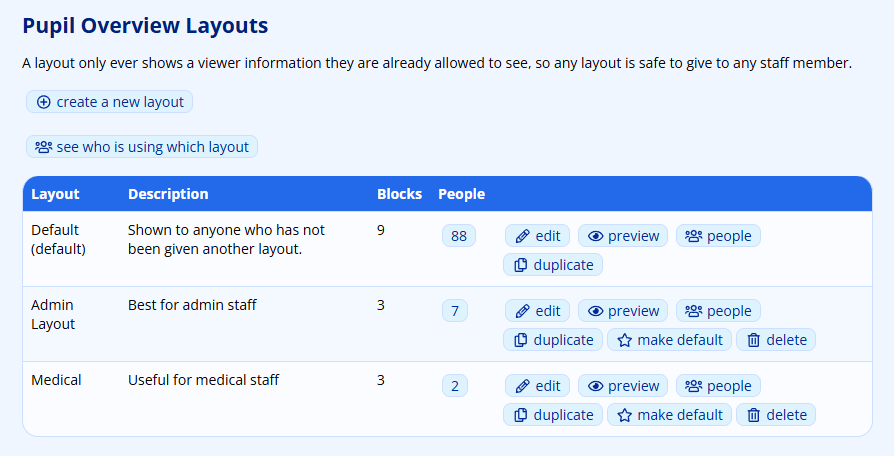
The catalogue lists each layout with its description, how many blocks it contains and how many staff members are currently using it. The default layout is marked as such. The People count is itself a link, and opens the list of the staff members it counts. Each row offers the following actions:
- edit — change the layout’s name, description and blocks.
- preview — see the layout rendered against a real pupil, family or staff member.
- people — see the staff members who are using this layout, and move them to another one.
- duplicate — take a copy of the layout, as a starting point for a new one.
- make default — promote the layout to be the school’s default.
- delete — remove the layout entirely.
The last two are not offered for the layout that is already the default.
Above the table, see who is using which layout opens the same list for every staff member at once, rather than for a single layout.
Creating a New Layout
Click on create a new layout, give the layout a Name and a Description, and click on Create. The name is what staff members see when they choose a layout, and the description is shown alongside it, so it is worth spending a moment on both: “Register teacher’s view — contact details and today’s absentees” helps a teacher choose far more than “Layout 3” does.
ADAM then takes you straight to the block editor so that you can add some content.
Editing the Blocks
The block editor is where the page is actually assembled.

The Name and Description of the layout appear at the top of the screen and can be changed here at any time.
The Add another block option adds a new, empty block to the end of the page.
Each block carries three small controls in its top right corner to move it up, move it down, or remove it from the page. No confirmation is asked for — but nothing is written until you save, so if you make a mistake, simply leave the page without saving.
Within each block are the following options:
- Heading — an optional heading displayed at the top of the block. It is not required; the photograph block, for example, has no heading.
- Colour — the colour of the block. The choices are Default, Red, Yellow, Green and Blue.
- Width — how wide the block should be: One third, Half, Two thirds or Full width. The editor adjusts the block as you change this, to give you an idea of what the finished page will look like.
-
Contents — whether the block shows a Field list or a Widget.
-
A Field list block shows one or more of the scratch list fields. Staff will only see the fields they have been given permissions to see. If only a single field is chosen, the field’s name is not shown and its contents appear as a plain paragraph — so use the heading to give it context.
- A Widget block shows one of the ready-made panels that ADAM (and its modules) provide, such as the photograph, the family information panel, the current period’s marks, or a module’s own card. Choose the one you want from the Widgets list.
As an example, this is how the familiar red Allergies block is put together — a red, one-third block containing a field list of exactly one field:

Which appears on the overview screen like this:

When you are happy, click on the Save button at the bottom of the screen.
Warning
How the blocks actually arrange themselves on the finished page depends on what is in them. ADAM arranges them as best it can, so the editor is not a perfect representation of the result. Use the preview to check, and come back and reorder the blocks if you need to.
Note
A layout with a very large number of blocks and fields can produce a form too big for the server to accept. If that happens, ADAM refuses the save and tells you so, rather than quietly losing the blocks that fell off the end. Use fewer blocks, or fewer fields per block, and try again.
Previewing a Layout
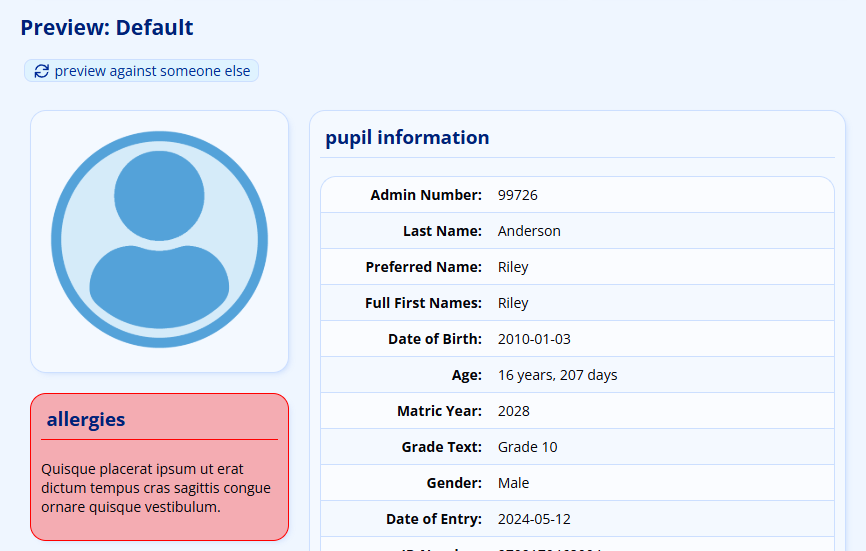
Click on preview this layout (in the editor) or preview (in the catalogue or on the layout chooser). ADAM asks you to choose a pupil, family or staff member, and then renders that person’s overview screen using the layout.
Note
The preview shows what you would see. A staff member with fewer permissions will see less. Previewing is only available to people who are allowed to view the profiles concerned in the first place.
Seeing and Changing Who Uses What
Click on see who is using which layout above the catalogue for the whole staff, or on people next to a single layout for just the people on that one. (From a single layout, show everybody widens it out again.)
The list names every current staff member, the layout they are on, and how they came to be on it:
- own choice — they chose this layout themselves.
- assigned — an administrator put them on it.
- following the default — they have no layout of their own, so they get the school’s default.
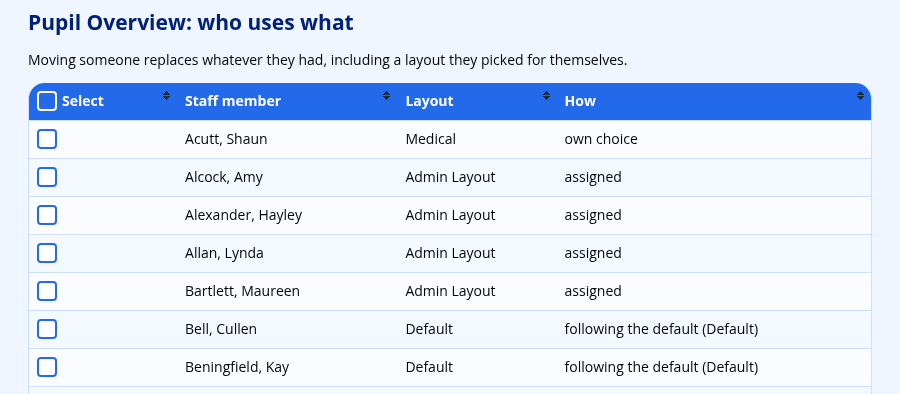
To move people, tick them in the list, choose where they should go next to Move selected to:, and click on Move selected. The destination can be any layout, or Follow the school default, which takes the layout off their record so that they follow the default from then on.
This is how you would give, say, every register teacher the layout suited to their work, without waiting for each of them to find it for themselves.
Warning
Moving somebody replaces whatever they had, including a layout they picked for themselves. They are not asked, and their old choice is not remembered. If they have the permission to choose their own layout, they can simply pick another one afterwards.
Making a Layout the Default
Click on make default. From then on, that layout is used by anybody who has no layout of their own and has not been put onto one. There is exactly one default layout per screen, so the layout that was previously the default becomes an ordinary layout again.
Deleting a Layout
Click on delete next to the layout. ADAM protects a layout that is still in use:
- The default layout cannot be deleted. Make another layout the default first.
- A layout that staff members are still using cannot be deleted. Move them to another layout first, using people — ADAM tells you how many people are affected.